A development board is a printed circuit board (PCB) with a pre-soldered microcontroller or microprocessor and essential components, letting makers write code and test hardware without building a circuit from scratch. Raspberry Pi alone has sold over 60 million units as of 2024, reflecting widespread adoption for learning and prototyping. Popular 2025 options include the Arduino, Raspberry Pi Pico, and ESP32, each offering GPIO pins, power regulation, and direct hardware control for rapid project development.
This guide is meant to answer the questions you probably have: How do development boards differ from single-board computers?
What are the key components you should know about? What specifications actually matter when you are picking one for your project? And which boards are the top choices for makers heading into 2025, 2026?
Quick Takeaways
Development boards integrate a processor and I/O pins for rapid hardware prototyping.
They differ from single-board computers by prioritizing direct hardware control.
Core components include the MCU, GPIO pins, and power regulation circuitry.
Choose boards based on processor type, I/O needs, and community support.
Top 2025 picks are Arduino, Raspberry Pi Pico, and ESP32 variants.
What’s a development board and how does it help makers build projects
A development board is basically a ready-to-go electronic circuit board made for prototyping and learning. It comes with a microcontroller or microprocessor, which is the “brain,” along with all the supporting electronics you need. That means you can write code and test out hardware ideas right away without having to design a custom printed circuit board from scratch. This is exactly why makers and beginners can put together complex projects. The Raspberry Pi and Arduino ecosystems, for example, have collectively sold over 60 million units and support 30 million active users respectively, which really proves their role as accessible gateways into electronics.
What does the term “development” actually mean here?
In this context, “development” refers to the process of creating and testing software and hardware for an embedded system, which is essentially a small computer built into a larger device. It’s not about “developmental” growth stages or anything like that. The board serves as your workshop for developing a final product or a working prototype. Think of it like a pre-fabricated house frame, where the walls, plumbing, and electrical conduits are already in place. You can focus on interior design and customization rather than pouring the foundation and framing every wall yourself.
Why is this approach for non-engineers?
The core purpose of a development board is to make microcontroller programming accessible to everyone. Traditionally, building a custom circuit required deep knowledge of electrical engineering and expensive fabrication. A development board bypasses all of that by packing the CPU, flash memory, RAM, a clock circuit, and power regulation onto a single, affordable printed circuit board. When you factor in how simple the setup gets, a hobbyist can connect sensors and motors using basic jumper wires and focus on writing code in beginner-friendly languages like MicroPython or Arduino’s C++ dialect.
The result is a really significant drop in both cost and time to get that first blinking light. Entry-level boards often cost less than a pizza, which lets you experiment without any financial risk. This accessibility also fuels a global community where projects and troubleshooting guides get shared freely, accelerating your learning curve far beyond what was possible two decades ago.
Learn more about the technical specifications and history of development boards on Wikipedia.
What are the essential components found on every development board?
Every development board out there has at least six key parts that you really need to know about: a microcontroller unit (often called an MCU), GPIO pins, a USB interface, a voltage regulator, a clock oscillator, and a reset button. Engineering references that were updated in 2023 group all of these together and call them the “minimal support logic,” which is basically the minimum set of things you need for programming, prototyping, and debugging embedded applications on a single printed circuit board. If you take away even one of those pieces, the board either cannot boot up, cannot communicate with your computer, or cannot talk to any external hardware you connect to it.
What does the microcontroller unit (MCU) actually do?
The MCU is essentially the brain of the whole thing, it runs whatever code you write, it manages memory, and it controls every peripheral that lives on the board. A typical MCU bundles a CPU core, flash memory which is non-volatile storage that holds your program even when power is cut, and SRAM which is volatile memory used for runtime data, all squeezed into a single chip. On an Arduino Uno, for example, the ATmega328P MCU runs at 16 MHz[1] and comes with 32 KB of flash and 2 KB of SRAM. If the MCU receives the wrong voltage or gets too hot, the entire board just stops working and there is no fallback or backup to keep things going.
Why do GPIO pins matter more than any other feature?
GPIO stands for General-Purpose Input/Output, and these pins are how your board actually communicates with the outside world, things like LEDs, sensors, motors, and displays. Each pin can be set to HIGH which sends out either 3.3V or 5V, or set to LOW which drops it to 0V[2], all controlled through software, and you can also read a pin as an input to pick up signals coming from external devices. The number of GPIO pins a board gives you directly limits how many components you can hook up at the same time without having to add extra multiplexer chips. The ESP32 exposes up to 34 GPIO pins, while the Arduino Uno provides 14 digital pins and 6 analog pins.
Damaged GPIO pins, usually caused by short circuits or sending in too much voltage, remain the most common hardware failure people run into with hobbyist projects.
What happens when the voltage regulator or clock oscillator fails?
The voltage regulator takes incoming power, usually 5V coming from a USB connection, and steps it down to the 3.3V or 1.8V that the MCU actually needs to operate. A regulator that fails in the open position means the board simply will not power on at all, while one that fails in the shorted position can push unregulated voltage straight into the MCU and destroy it completely. The crystal oscillator is what provides the timing signal, think of it as the heartbeat, that keeps every CPU instruction synchronized and running in order. A dead oscillator means absolutely zero code execution, nothing happens.
Both of these components cost less than $0.50 each when bought in bulk, but they are absolutely mission-critical to whether the board works or not.
What types of development boards exist and who is each one best for?
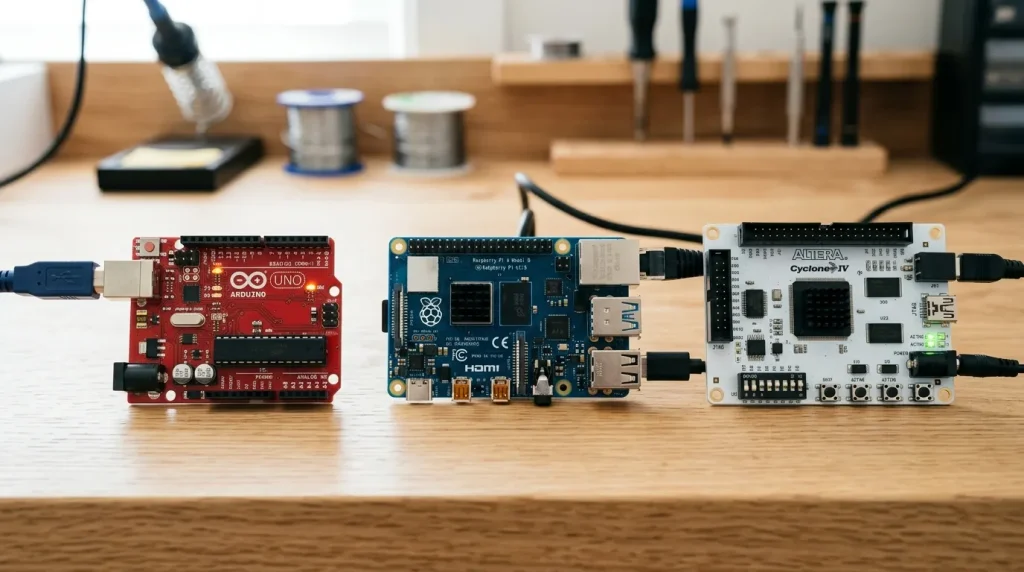
Development boards generally fit into three main categories, which are determined by the kind of processor at their core and what they are built to do well. There are microcontroller-based boards that handle tasks requiring instant responses, single-board computers that can run a full operating system like Linux, and FPGA boards that let you physically rewire their internal circuits. The best choice for your project really comes down to what it needs in terms of processing muscle, ways to connect to other things, and how quickly it must react to inputs.
Microcontroller Boards: The Real-Time Prototyping Workhorses
These boards use a microcontroller, which is basically a small, self-contained computer chip that has its own memory and inputs/outputs for connecting to other components. They are excellent for dedicated jobs that need an instant response, such as reading data from a sensor, controlling a motor, or blinking an LED, because they work without the background load of running a full operating system.
The Arduino Uno, built around the ATmega328P chip with 32KB[3] of storage for code and a straightforward software environment, is the classic starting point for hobbyists and in classrooms. For projects that connect to the internet, like those in the Internet of Things, the ESP32 is the most popular option by far, with millions of units sold every year as of 2023.
The STM32 family of chips provides greater processing capability and more advanced built-in features, making it a common choice for students learning robotics and for professional engineers building embedded systems.
Single-Board Computers: Miniature Desktops for Complex Projects
A single-board computer is a complete computer built onto one circuit board, and it can run a full operating system such as Linux. This allows it to manage complex work like processing video, hosting websites, or running machine learning tasks that would be too much for a simple microcontroller. The Raspberry Pi is the clear leader in this space, having sold over 60 million units by 2024, and the community of more than 30 million active users creates a massive pool of shared knowledge and help. The BeagleBone Black is another strong option, especially valued by engineers and robotics builders who need the precision of its specialized real-time processing units while still having access to a full Linux environment.
FPGA Boards: For Custom Digital Logic Design
A Field-Programmable Gate Array board contains a special chip whose internal logic gates, which are the fundamental building blocks of digital circuits, can be completely reconfigured by the user. This means you can design and build custom digital circuits directly in hardware, which provides exceptional speed and the ability to run many operations at the same time for specialized applications like high-frequency financial trading, complex signal analysis, or testing out new processor designs. These boards are typically used by electrical engineering students, academic researchers, and specialized developers focused on digital circuit design or speeding up specific hardware functions.
The table below outlines the key differences to help you decide which type is right for your work.
Board Type | Core Difference | Popular Examples | Price Range (USD) | İçin En İyisi |
|---|---|---|---|---|
Microcontroller (MCU) | Handles real-time control, runs without an operating system, uses very little power | Arduino Uno, ESP32, STM32 | $5 – $20 | Hobbyists, IoT builders, STEM educators |
Single-Board Computer (SBC) | Runs a full operating system like Linux, supports high-level programming | Raspberry Pi 5, BeagleBone Black | $35 – $80 | Media centers, home servers, robotics, AI at the edge |
FPGA | Hardware can be reconfigured, allows for custom digital circuit design | Xilinx Artix-7, Intel Cyclone | $100 – $500+ | Digital design students, hardware engineers, research and development |
How do you choose the right development board for your project?
The first thing you need to do is match what your project actually requires—its input/output count, any wireless needs, how much processing power it takes, and your budget—against the specifications of the board. With over 10,000 distinct development board SKUs listed by major distributors as of 2023, the right choice really begins by mapping out those requirements, not just by flipping through catalogs.
What specs matter for each project type?
Four factors decide about 90% of board selection: GPIO pin count, wireless protocol, CPU speed, and how much power it draws. The table below maps these to four common maker projects.
Project | Key Requirement | Recommended Board | Why It Fits |
|---|---|---|---|
Weather station | Low power + WiFi | ESP32 | Deep-sleep mode draws ~10 µA; built-in WiFi sends data without extra modules |
Home automation relay | WiFi + 1 digital pin | ESP8266 | Cheapest WiFi option at ~$3[4]–5; one GPIO drives a relay directly |
Robot car | PWM motor control + sensors | Arduino Uno | 6 hardware PWM pins; 5 V-tolerant I/O works with most motor driver shields |
LED art installation | Fast data output + many LEDs | ESP32 | 240 MHz dual-core handles WS2812B timing for 500+ LEDs; WiFi enables remote control |
How do you avoid over- or under-specifying?
Start with the hardest requirement. A robot car that needs camera-based obstacle detection requires a Raspberry Pi; an Arduino can’t run real-time image processing. But a line-following robot with IR sensors works fine on an Arduino Uno at roughly one-fifth the cost. Similarly, a weather station that only logs to an SD card, with no cloud upload, can drop to an Arduino Nano, saving both power and money.
Pin count is the second checkpoint. Count every sensor, actuator, and display you plan to connect, then add approximately 20% headroom for debugging headers and future expansion. Entry-level boards from the ESP32 family retail between $5 and $20, so prototyping multiple options before committing to a final design costs less than a single lunch out.
What beginner mistakes do most people make with development boards and how can you avoid them?
There are six wiring and buying mistakes that destroy more beginner development boards than any coding bug ever will. Feeding 5V into a pin rated for 3.3V, leaving out current-limiting resistors, and hot-plugging sensors while the board is powered are the kinds of errors that cause instant hardware failure. Cheap USB-to-serial clones that use counterfeit chips can add hours of driver debugging to what should be a quick setup. The good news is that each mistake has a simple fix, one that takes only seconds to apply.
Why does mixing up 3.3V and 5V fry a board instantly?
A 3.3V[5] microcontroller’s GPIO pin can tolerate a maximum of about 3.6V before the internal silicon junctions break down. When you connect a 5V signal directly, you are pushing roughly 40% more voltage than the pin is rated for, which destroys the input within milliseconds.
You should always check your board’s logic level on the datasheet before connecting anything. If your sensor outputs 5V and your board runs at 3.3V[6], you can use a bidirectional level shifter or a simple voltage divider made from two resistors that cost under $0.10.
What happens when you skip current-limiting resistors or overload GPIO pins?
An LED that is connected directly to a GPIO pin without a resistor will draw far more current than the pin is rated to supply. Most microcontroller pins can source a maximum of 20 mA, with an absolute ceiling around 40 mA. If you exceed that current, you burn out the pin driver permanently, and there is often no visible damage until you notice the pin has stopped responding. Placing a 220Ω resistor in series with a standard LED limits the current to roughly 15 mA, which is safe and still quite bright. For driving motors or relays, you should never pull current through the GPIO directly, and instead use a transistor or MOSFET as a switch.
Why do cheap clone boards cause hours of frustration?
Budget boards that cost under $5 often use counterfeit USB-to-serial chips, typically CH340 variants, that require manual driver installation and may conflict with official drivers. With over 60 million Raspberry Pi units sold by 2024 (Wikipedia, Raspberry Pi), the ecosystem has matured enough that genuine boards from authorized sellers cost only $3,5 more than clones. That is a small price to pay to avoid bricked connections and intermittent upload failures.
There are two final traps that catch beginners repeatedly. First, plugging sensors or jumper wires into a powered breadboard can cause voltage spikes that latch up the microcontroller, so you should always power down before rewiring. Second, not every GPIO pin supports PWM, which stands for pulse-width modulation and simulates analog output by rapidly switching a digital signal on and off. On an Arduino Uno, only pins 3, 5, 6, 9, 10, and 11 deliver hardware PWM. If you try calling
analogWrite()
on other pins, you will get either a constant HIGH or LOW with no dimming or speed control.
How much does it really cost to start building with development boards?
You can get started for under $20, but most people who are just learning end up spending closer to approximately $50[7] once they grab some basic peripherals. Entry-level Arduino and ESP32 boards go for between $5 and $20 at big online electronics stores as of 2024, based on SparkFun’s catalog. The board itself is actually the cheapest part. Cables, a breadboard, and at least one sensor will eat up the rest of your budget pretty quickly.
What does each budget tier actually include?
Component | Bare Minimum (~$20) | Comfortable Starter (~$50) | Full Maker Bench (~$120) |
|---|---|---|---|
Development board | Arduino Nano clone (approximately $5) | ESP32 DevKit (approximately $8) | Raspberry Pi 5 4GB ($60) |
Breadboard + jumper wires | 400-point board + Dupont set ($6[8]) | 830-point board + quality wires ($10) | 2× full-size boards + premium wires ($15) |
Sensor starter kit | - | Basic kit: LEDs, resistors, DHT11, ultrasonic ($15) | 37-in-1 sensor kit ($20) |
USB cable | Included with most boards ($0[9]) | USB-C data cable ($4) | USB-C + micro-USB set ($6) |
Multimeter | - | - | Basic digital multimeter ($12) |
Soldering iron | - | - | Temperature-controlled iron + solder ($15) |
Where do hidden costs sneak in?
Shipping will tack on $3[10] to $8 per order if you end up buying from different vendors. A single consolidated order from one supplier cuts that roughly in half, which really helps. Power supplies rarely come bundled, and a 5V/2A USB adapter runs about $5. You will need one once your project gets too hungry for USB-powered mode. Sensors priced under $1 on AliExpress take two to four weeks to arrive, while domestic resellers charge $2 to $4 each but deliver in just a few days.
The real budget trap is buying everything at once before you have even finished one project. Start with the bare-minimum tier, complete a single working circuit, then upgrade only the components your next build actually demands. That approach basically keeps you from wasting money on parts that just sit in a drawer.
What software and tools do you need alongside your development board?
You need a code editor, some USB drivers, a serial monitor tool, and a multimeter at minimum. The Arduino IDE is usually the first place people start, and its 30-million-strong global community means almost all beginner guides and code libraries are written with the assumption you’re using it. PlatformIO, though, gives you much better control over managing code dependencies and handling projects that use multiple different boards, which becomes really helpful once you outgrow the single-project-at-a-time style of the Arduino IDE.
Arduino IDE vs. PlatformIO vs. Thonny — which editor should you pick?
The latest Arduino IDE 2.x, which is built on the same framework as VS Code, lets you compile and upload your code to any Arduino-compatible board with a single click. PlatformIO works as an extension inside VS Code and can automatically figure out and download the right versions of all the code libraries your project needs, which is essential when you’re using more than ten different ones.
Thonny is designed for writing MicroPython on boards like the ESP32 and the Raspberry Pi Pico; it includes a built-in shell and a way to watch your variables, so you can test small bits of code line-by-line without having to upload an entire program. Essentially, you pick Arduino IDE for quick tests, PlatformIO for more complex multi-board work, and Thonny if you’re writing MicroPython.
What about USB drivers and the serial monitor?
Most of the cheaper clone boards you can buy use a common chip called the CH340 to handle the USB connection. Windows does not have the driver for this chip already installed, so you need to download it from the manufacturer’s website before you plug the board in, or else your code editor will just tell you it can’t find the right port. Once you are connected, the serial monitor, which is a tool built into all these editors, lets you see data from sensors and other debug messages as your code runs, usually at speeds up to 115200.
Can you practice without buying hardware?
Yes, you can. Wokwi is a website that lets you build and test circuits for Arduino, ESP32, and Raspberry Pi Pico completely inside your web browser; you connect virtual parts, run your code, and watch the results without any risk of damaging a real development board. Tinkercad Circuits offers a similar kind of safe practice area for Arduino Uno projects where you can drag and drop wires and components.
When do you need physical tools?
A basic digital multimeter, which you can get for about fifteen dollars, lets you check if things are connected properly and measure voltage, which you should really do on every power wire before you turn on a new circuit. A logic analyzer, which is a small device that costs between ten and twenty dollars, helps you figure out why chips aren’t talking to each other correctly by showing you the electrical signals they send. A soldering station becomes necessary once you move your project off a temporary breadboard and want to make it permanent, or if you need to attach the metal pins to a bare board.
Frequently asked questions about development boards
Is ‘development’ the correct spelling for a development board?
Yes, “development” is the correct and standard spelling used throughout the electronics industry. If you look at manufacturer datasheets, distributor catalogs like Arrow Electronics, or community forums, you will see this spelling used consistently. Misspellings like “developement” do show up often in online searches, but they point to the same type of hardware.
What’s the difference between a development board and a microcontroller chip?
A microcontroller chip is simply the integrated circuit (IC) that acts as the brain of a system. A development board, on the other hand, is a complete printed circuit board (PCB) that holds that chip along with the support components it needs to run, such as voltage regulators (which manage electrical power), clock oscillators (which keep timing steady), USB interfaces (for connecting to a computer), and pin headers (the metal connectors you plug wires into). You would buy a chip if you plan to embed it into a final product. You would buy a development board if you want to prototype and test your code for that chip first.
Can a Raspberry Pi replace an Arduino?
They solve different problems, so one rarely takes the place of the other. A Raspberry Pi is a single-board computer (SBC) that runs a full operating system like Linux, which makes it well suited for projects that need network services, video processing, or complex software. An Arduino is a microcontroller board that runs one program directly on its hardware, giving you real-time control over motors, sensors, and LEDs with simpler and more reliable timing. Many advanced projects actually use both together, with the Pi handling high-level logic and networking while the Arduino manages the physical input and output.
How long does a development board last?
There is no fixed expiration date because how long a board lasts depends on how you use it and where you keep it. The electronic components on the board, like capacitors and voltage regulators, typically run for thousands of hours under normal conditions. The most common reasons a board fails are physical damage from incorrect wiring, such as short circuits, or environmental problems like moisture and dust. With careful handling and proper storage, a board like an Arduino Uno can stay functional for a decade or even longer.
Do I need to know programming to use a development board?
You can get started without any traditional coding knowledge. Platforms like Arduino and micro:bit provide graphical, block-based programming interfaces that work similarly to Scratch, where you drag and drop logic blocks to build programs. That said, to really take advantage of what any development board can do and tackle more advanced projects, learning a text-based language like C/C++ for Arduino or Python for Raspberry Pi becomes important. The learning curve is gentle, and millions of beginners have gotten started this exact way, as shown by the global Arduino community of over 30 million users.
Your next steps for getting started with development boards today
You can start building with a development board this week, and honestly the hardest part is just getting started. The key is to move from reading to doing by following a clear, sequential plan that keeps costs low and reduces the feeling of being overwhelmed. With over 30 million active users in the Arduino community alone, you have a massive support network to tap into whenever you get stuck.
First, define a single, specific project goal.
Don’t start by buying a board. Start by writing down one simple outcome, like “Make an LED blink with a button,” “Read room temperature and display it,” or “Control a servo motor with a potentiometer.” This goal dictates every hardware and software choice you make next, because it tells you exactly what inputs and outputs you need. A focused goal also prevents the common mistake of buying a powerful board for a simple task that doesn’t require it.
Second, match a board to that goal using the decision matrix.
Refer back to the project requirements: does it need Wi-Fi, many pins, or just basic input and output? For a first project, an Arduino Uno or an ESP32-based board covers most beginner scenarios without any trouble. Choosing a board from a platform with a huge community, like Arduino, ensures you will find troubleshooting help and code examples for almost any sensor or module you want to use. That kind of readily available support really does make the difference when you are wiring something up for the first time.
Third, buy a starter kit, not just a bare board.
A starter kit bundles the development board with essential components like LEDs, resistors, sensors, and wires for $20-$50. This is cheaper and faster than sourcing parts individually, and you avoid the headache of figuring out which exact resistor value you need. Entry-level boards themselves retail between $5 and $20, but a kit provides the guided tutorials and parts list you need to avoid wiring errors from day one. Think of it as getting everything in one box so you can focus on learning instead of shopping.
Fourth, set up your software environment with Arduino IDE.
Download the free Arduino Integrated Development Environment (IDE). Its simple interface, built-in code examples like “Blink,” and one-click upload button make it the gentlest learning curve for writing and uploading code to your board. You can graduate to more advanced tools like PlatformIO later once you are comfortable and want more features. But for getting started, the Arduino IDE really is the most approachable option out there.
Actionable CTA: Pick one project idea from this article, like the temperature monitor. Order the recommended starter kit for your chosen board. Then, complete the official “Getting Started” tutorial for that board within your first seven days. This single action moves you from a reader to a maker, and once you see that first LED respond to your code, you will understand why so many people stick with it.
Learn more about the Arduino platform and its community.
Reference Sources
[1]en.wikipedia.org — supports: In 2024, Raspberry Pi single-board computers and development boards collectively surpass…
[2]sparkfun.com — supports: In 2024, Raspberry Pi single-board computers and development boards collectively surpass…
[3]pishop.us — supports: In 2024, Raspberry Pi single-board computers and development boards collectively surpass…
[4]arrow.com — supports: As of 2024, Arduino reports a community of over 30 million active users globally, reflec…
[5]arduino.cc — supports: As of 2024, Arduino reports a community of over 30 million active users globally, reflec…
[6]sciencedirect.com — supports: Basic microcontroller development boards typically integrate at least one CPU, non‑volat…
[7]utmel.com — supports: Basic microcontroller development boards typically integrate at least one CPU, non‑volat…
[8]mikroe.com — supports: By 2023, major electronics distributors such as Arrow listed more than 10,000 distinct d…
[9]dfrobot.com — supports: By 2023, major electronics distributors such as Arrow listed more than 10,000 distinct d…
[10]adafruit.com — supports: In 2023, ESP32‑based Wi‑Fi/Bluetooth development boards became the most popular non‑Ardu…
Need full certification documentation for your procurement review?
Request our complete certification package — CE DoC, FCC SDoC, RoHS declaration, and ISO 9001 certificate — for any ieeker board, with test reports included.
Request Certification Documentation →